Viper Truck

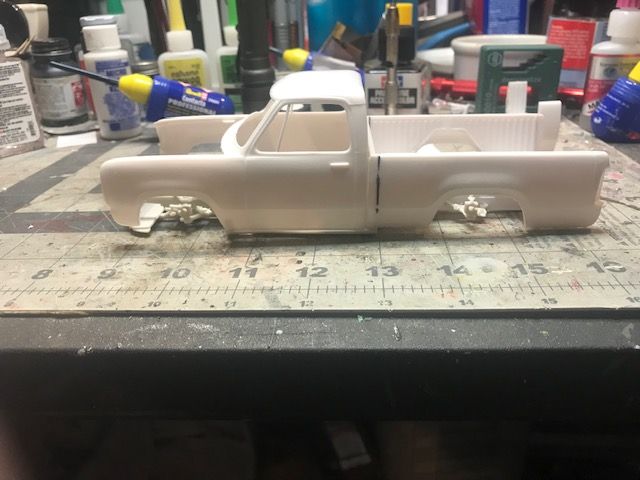
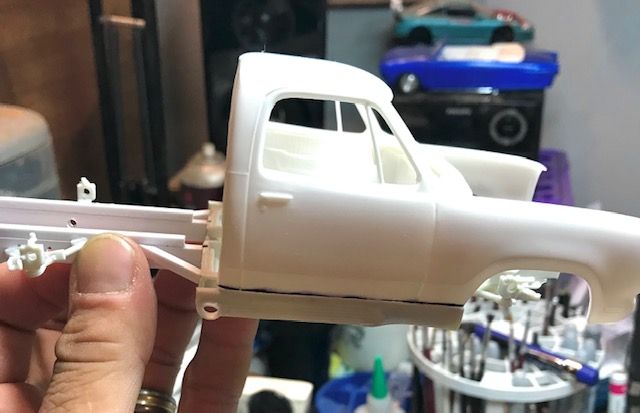
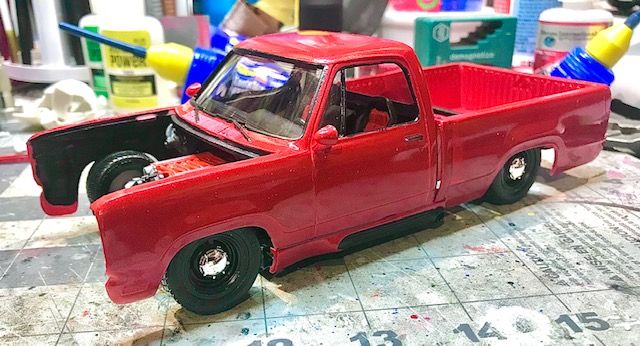
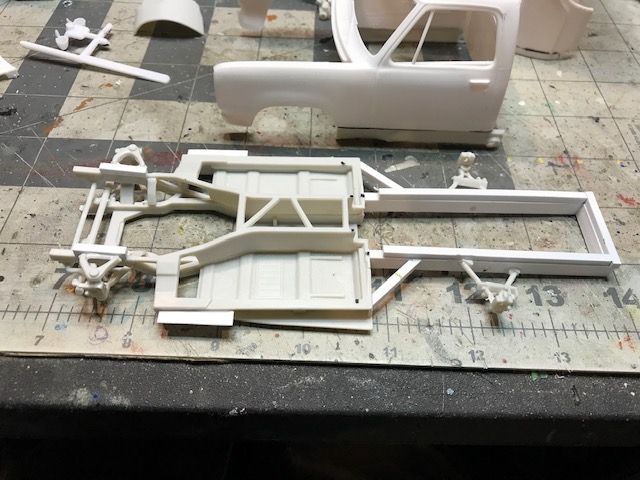
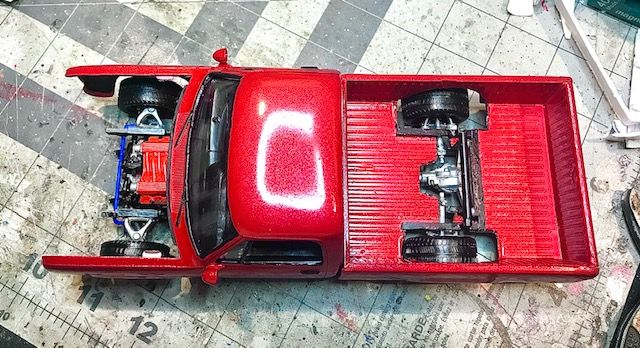
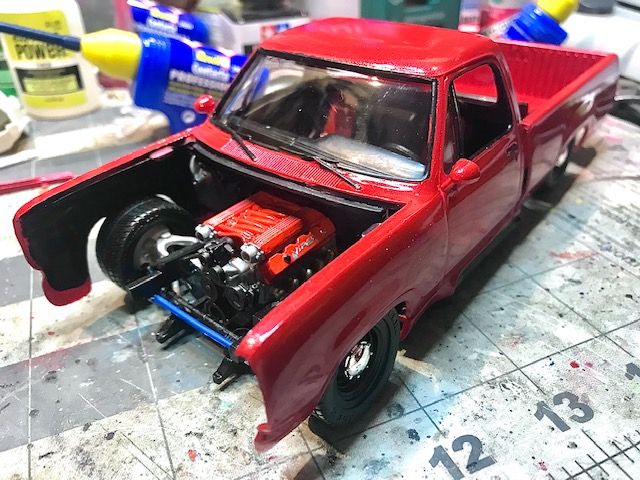
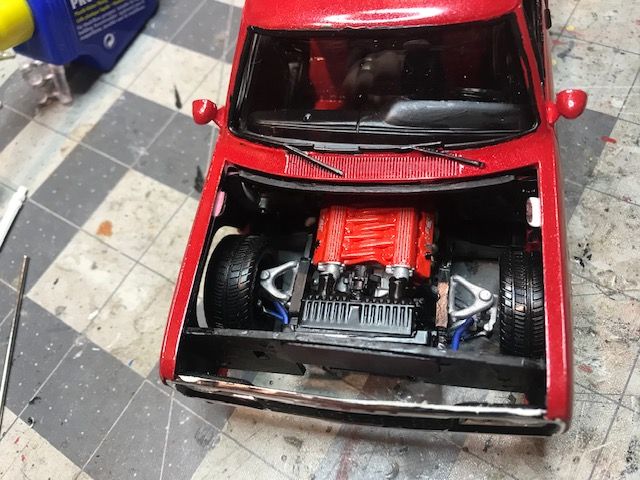
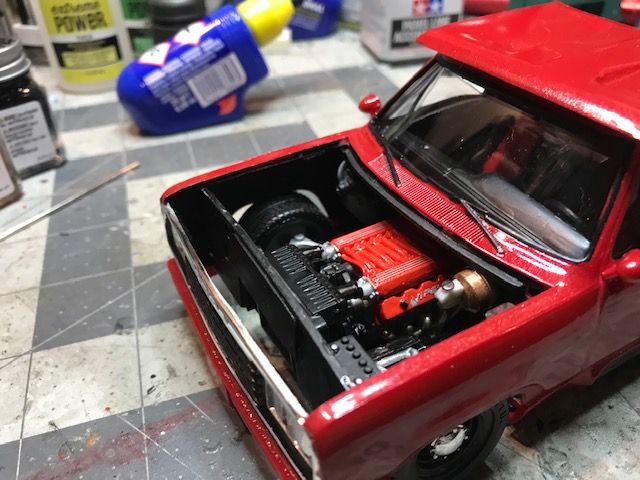
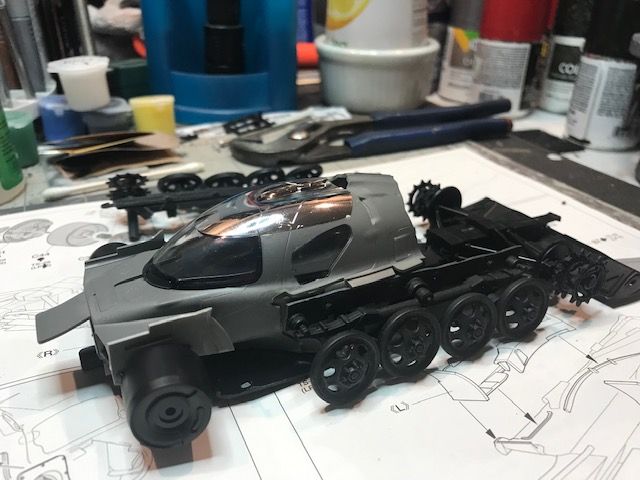
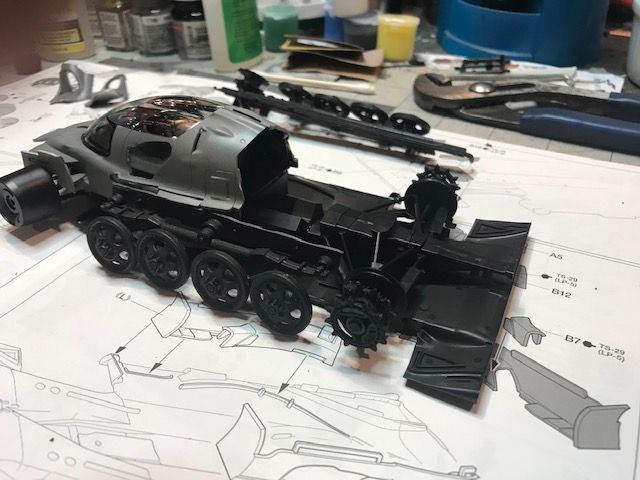
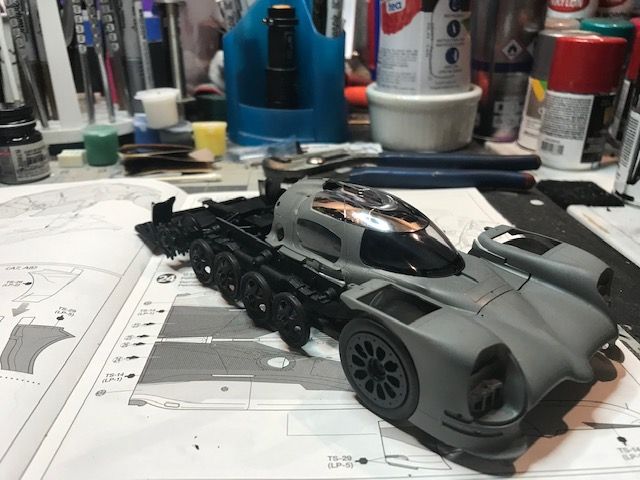
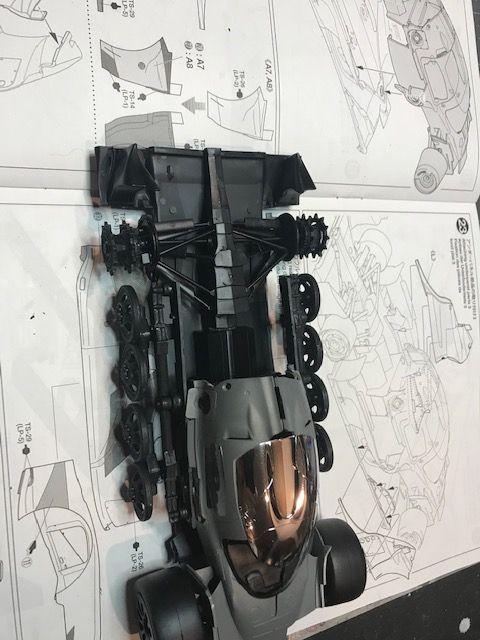
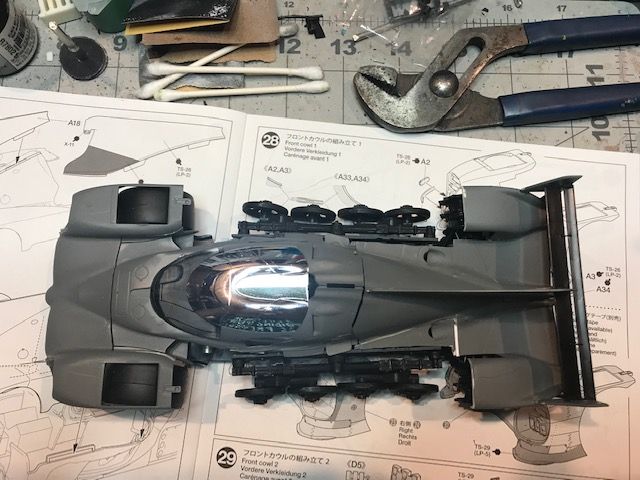
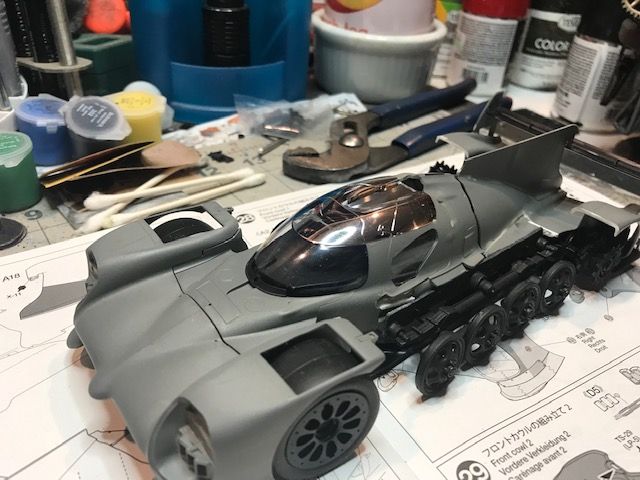
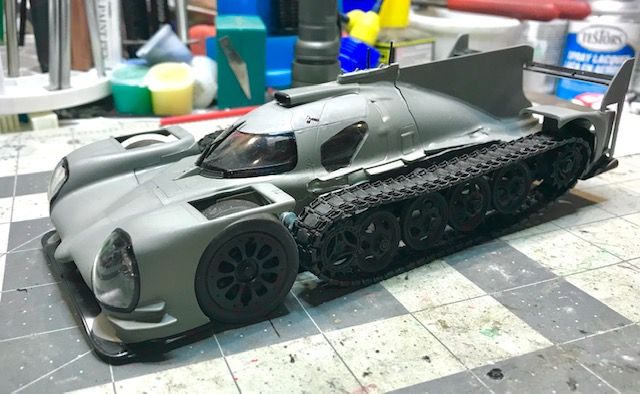
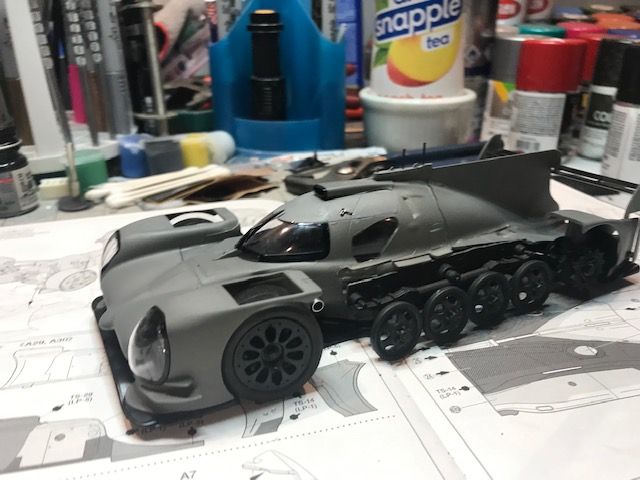
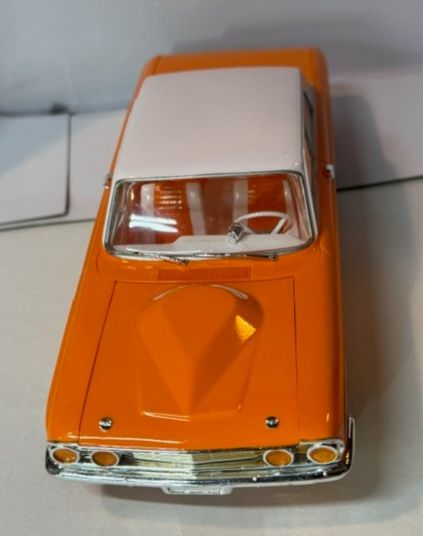
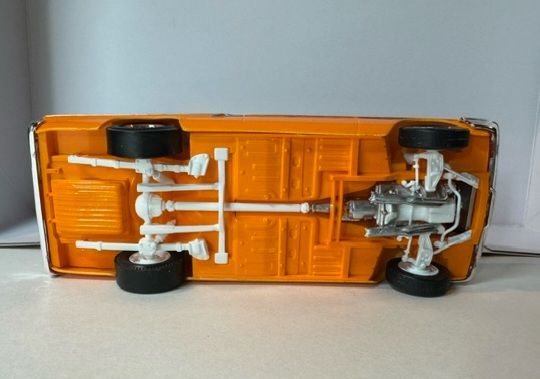
Tell me if you have heard this one before. What to do when you have too many Dodge Viper kits laying around, and an antique MPC D50 truck kit in desperate need of “something”. Well, as you can see you make one vehicle out of two!  After shortening the bed of the truck and chopping the Viper chassis just behind the seats the build begins to take shape. I scratchbuilt the rear portion of the frame using styrene beams as that was the only way to get the wheelbase to work out correctly. The trickiest part of this build was getting the Viper independent rear suspension and giant axle assembly to work with the truck bed. My chosen, lowered ride height complicated things as the bed needed extensive modifications to allow everything to clear.  The cab of the truck was treated to Viper rocker panels and side pipes which fit perfectly with minimal contour correction needed. The engine sits under the cowl with the transmission crowding the driver, just like it does in the Viper LOL Builds like this one are what I enjoy most about this hobby. The ability to bring to life a vehicle that isn’t physically possible in 1:1 scale without spending millions of dollars

– Ross

Half Track

All the buzz surrounding inter-genre building lately has reminded me of one of my favorite past projects. The following are images of my Toyota TSO50 half track. Built using the Tamiya kit of the Toyota, an Italeri Steyr RSO 1:35, and tracks meant for a WWII Sherman. The primary drive for the tank treads is accomplished using the Toyota drive train at the rear with aluminum tube sprocket mounts in the front. I basically began with the RSO driveline assembled and removed everything that wasn’t needed or was interfering with assembly to the car chassis. Same process on the body and chassis of the race car, Dremel until everything fits! LOL.  So there you go, I did build some armor once, sort of…

– Ross

Quality Control

Okay gents; I bet none of you have as robust quality control team as I do.  Most of them may look lazy, but they are just waiting (too eagerly) to criticize my work.   I think I better unionize myself and fight the man…uh…the dog!

– Chris

Collaboration Build – The Bike

Most modelers know their limitations on what they can build with confidence. Some are great at some things and not so good at others. That’s me!

I suggested a  collaborative build with Chris King our club president. Chris is a master at figures and busts. I am proficient at most any vehicle model. We agreed to split the duties on a 1/9 scale Dragon BMW R75 WWII motorcycle with a rider figure. I have completed the motorcycle less the minor weathering.

This build will be entered in the category Vignettes at the upcoming Penncon model show and contest on September 17th, 2024

-Scott

Collaboration Build – The Rider

Everyone at the last meeting saw Scots then in-progress build of the 1:9 scale German field motorcycle.  Scot has now finished the bike and now it’s my turn to complete the figure and his “kit” (term for gear).

The figure itself is a shame in that it is such a large scale but is toy-ish in appearance.  The arms did not fit and the plastic used was barbie-doll like; it just laughed at my Tamiya thin cement.  I had to use Gorilla super glue instead!

The rider, as molded, looks like a 29 yr old young boy.  Dragon opted to mold him with his body smock on instead of a jacket and uniform-which would have added depth and interest to the figure.  To overcome the over-simplicity of the as-molded figure I added a new hair do, eyebrows, forehead lines, and crows feet by the eyes.

I scratch built two mp-40 mag pouches from lead foil and Magic Sculp.  Straps were added to the gas mask container from lead foil and non slip was added to the large carry bag that goes on the bike to give it texture.

The mp-40 had its front sight bored out and the barrel’s end was drilled out.  The strap is from foil.
Dragon usually makes great kits. This kit was made years back and maybe then they were getting their act together.  If I had my druthers I would just chunk this figure and get the one aftermarket 1:9 scale rider— but at a cost of US$ 110 that would be a big pill to swallow!!!

The instructions have all of his kit attached to the bike, which is not entirely correct.  By putting the gas mask container, rifle, and mag pouches to the figure he should be a more interesting piece and better accompany the motorcycle.

To add some more to the figure, I added a riding glove to the right hand and made the left hand glove.  The soldier’s helmet will be off and upside down on top of the bike’s gas tank while he stops on the road to take a break.

– Chris

1/48 F-16C Viper in Flight

A few meetings ago i saw someone with a mig in flight on a base and i really loved it, so had a go myself at the same type of thing. This model is a 1/48 Italeri F-16C painted and decaled in the livery of the Ohio air guard…I liked the black decal scheme at the front. Also included a pilot in this one, seems strange when a jet is posed in flight with a ghost at the controls.


I like this style of displaying aircraft….so i’m going to be doing many more In flight displays with a base….wasn’t sure on if I liked the acrylic tubing, I might try something else in future like a thinner solid acrylic rod rather.

Anyway, I hope you enjoy the build. See ya at the next meeting.

Cheers: Don

Mustang and Thunderbolt

Here are my latest 2 builds.

1970 Mustang Mach 1 2n1 kit by Revell. It’s a beautiful kit with the option of doing a Boss 302 or a 351 Mach 1. The detail is as good as all of the other 1970 Mustang kits Revell has released over the years. I built it up as the Mach 1 as I already have a Boss 302. The only drawback that I had was with the decals on the hood. The instructions show placement after the hood scoop is installed. They comprise of two pieces. They over lap the scoop and each other. I had to trim away some so it didn’t look too horrible. It would have been easier to trim them before the scoop was installed. Note for the next one.


The second build was a 1964 Fairlane Thunderbolt. The kit is one of my favorites, hence I’ve now built 6 of them. This one was done to complete in the theme category for the PennCon show in September. The theme is “orange”, so it’s a combination of orange and white.


Jeff

Saturday, May 11

Wow; that was a great meeting.  There were 25 folks present so I think that is a record attendance day for us.  I really liked that.  The models on the table were great and my favorite was Jeff’s car carrier truck.  When Jeff puts on a few 1970-era cars on it, I can (sniff sniff) smell a future winner!

For June we will have our normal meeting with a talk on fiber optics by Todd, our resident master of lighting technique.  This is a subject area I have no good idea of how to do well (or at all).  A few of us will go off on a sidebar trip some day in June to do some shooting.  Anyone is welcomed to come-stay tuned via email on that event.

Congrats en masse to the club again for its bling-accumulation.  If I say so myself that cake was very tasty.  Hats off to all our 2024 bling collectors; I am sure more of you will add to the tally by December.  

Ross, many thanks for your class on painting cars.  Your cars are masterpieces so you being the teacher on this topic was very appropriate.

Keep those posts to the site coming.  Don’t worry about being a Shakespeare- just send your stuff!

– Chris

A Car!

To you non believers who thought I was not working on car – well here is a preview of my Rye Field Model 1/35 VW Type 87.  Some more final steps and it will be added to my vignette of two teenaged Volkstrum kids delivering weapons to the battle line in a destroyed Berlin in 1945.   The Front passenger seat was done with a technique Scot showed me; the driver seat was a mix of that and me adding the internal wires of a burned through back rest and the rear seat was entirely scratch built with 2 gauges of wire.  The car has seen better days but now it’s a burned out car on a debris laden street somewhere in Berlin.  The end of the Reich is near.

– Chris